
Here’s how to make dill pickles! Follow this easy, no fail tutorial to fill jars with the best tangy flavor and satisfying crunch.

Did you know you can make homemade dill pickles in just 20 minutes? They’re tangy, salty sweet with just the right crunch: infinitely better than store bought. So why not try your hand at it? Not only will you feel a pride in your new skill, you’ll have two pint jars of bright green spears to eat for lunch, dinner and snacks. Trust us: the jars won’t last long! Here’s everything you need to know about how to make dill pickles.
Finding the right cucumbers
These dill pickles use small pickling cucumbers (also called baby or Kirby). Don’t even think about using a standard cucumber! The type for canning are small, thin cucumbers. They’re labeled different things at the store, so you might see them called baby cucumbers, pickling cucumbers or Kirby cucumbers.
Other ingredients for this dill pickle recipe
Other than the cucumbers, all you need is a handful of ingredients to make this dill pickles recipe! Here are the remaining ingredients you need for how to make dill pickles:
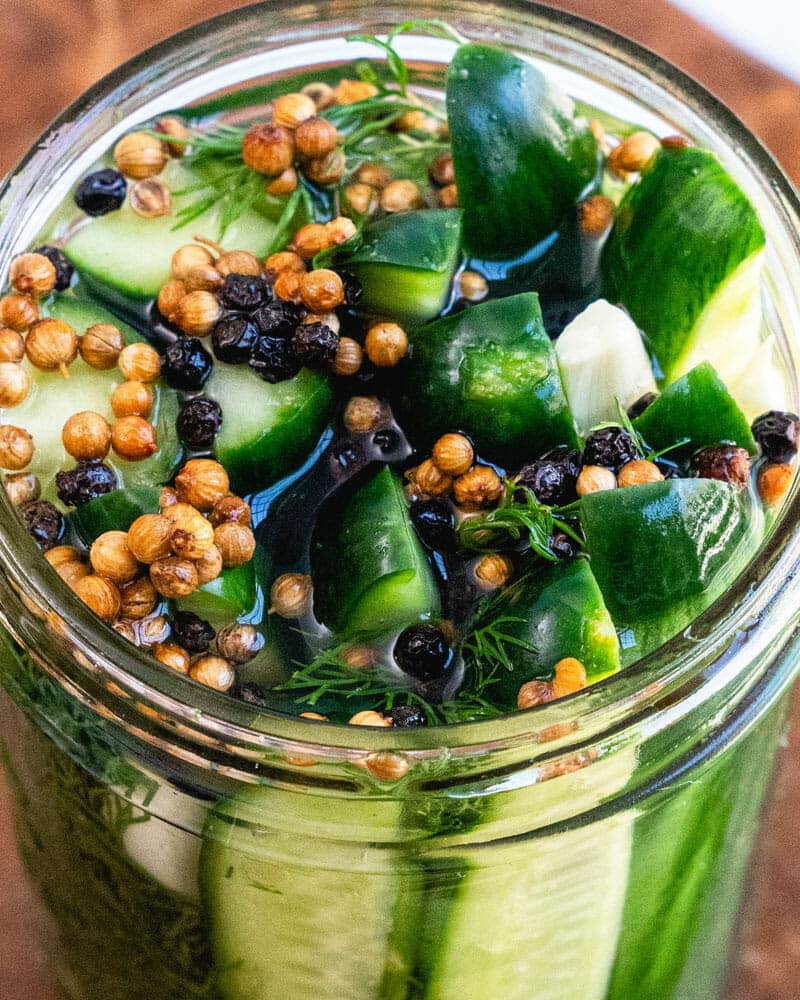
- Fresh dill: We like using fresh dill in our dill pickles. If you can’t find it or prefer a look without the herb, you can also use dill seeds! Use 2 teaspoons dill seeds for this recipe.
- Peppercorns & coriander seeds: These seeds add big herby flavor.
- Garlic: Garlic adds just the right savory note.
- Salt & sugar: Brings the flavor to the pickling brine.
- White vinegar: This is what makes the pickling action happen.
How to make dill pickles…in 20 minutes!
Once you’ve assembled the ingredients, pickling is a breeze! Here are the basic steps that you’ll follow for how to make dill pickles:
- Cut the vegetables & pack the jars. Slice up those long, thin cucumbers and pack them into the jars with dill and garlic.
- Make the brine. Dissolve the salt and sugar in the vinegar and water: it takes only 1 minute on the stove.
- Pour in the brine & cap the lid. Then pour in the brine, tap them on the counter to release any air bubbles, and cap the lid.
- Refrigerate 24 hours, or process for longer storage. Keep reading…

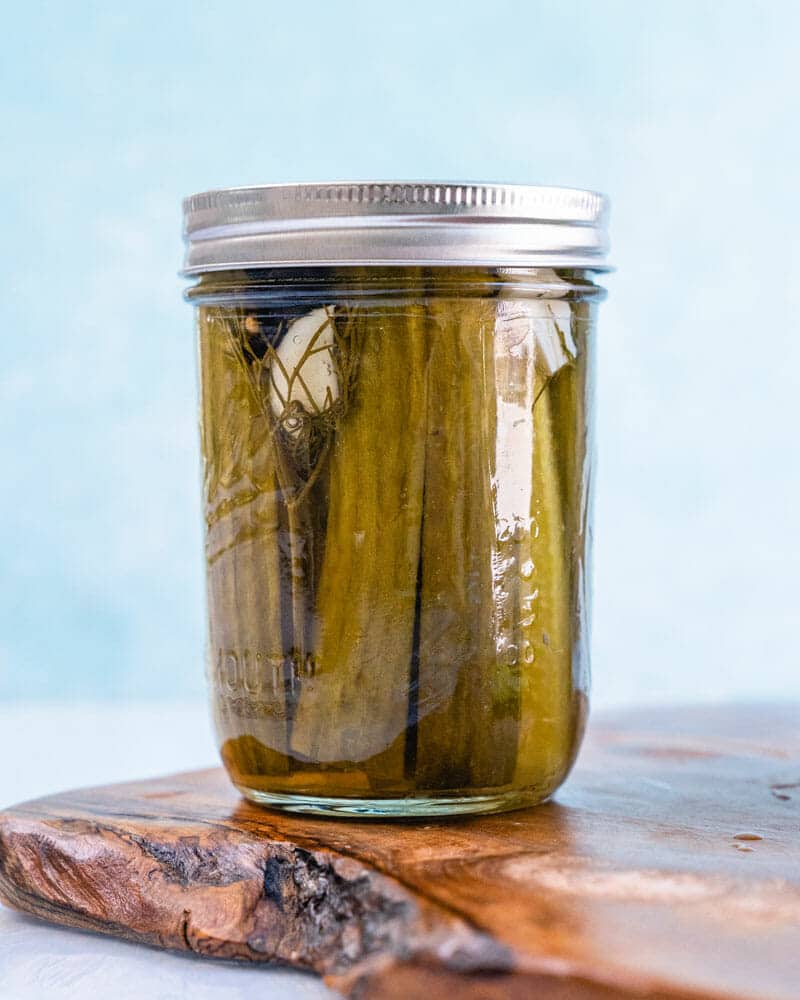
Method 1: Refrigerator pickles
Our favorite way to make dill pickles is refrigerator pickles! What are they and what are the pros and cons? Here’s a breakdown:
- Refrigerator pickles keep for 1 month in the refrigerator! You can eat them after 24 hours of refrigeration.
- They’re not shelf stable, but really: who needs them to be? We always eat them faster than 1 month.
- Refrigerator pickles are crunchy and bright green, with a crisp, tangy flavor. Processing the pickles makes them softer and milder. This is the main reason we love to make dill pickles as refrigerator pickles!

Method 2: Shelf stable pickles
Want your dill pickles recipe to last up to 1 year? Then you can process your pickles. Processing the pickles is simply boiling them for 10 minutes in a large pot. This kills all bacteria and allows them to be shelf stable for 1 year. Here’s more about this method:
- You’ll need a canning rack or any rack that keeps the jars off of the bottom of the pot.
- It takes 10 minutes to boil a jar of dill pickles.
- Processed pickles are softer, sweeter and milder, with a dull green color. This is because the boiling water cooks the pickles a bit. Alex and I prefer refrigerator pickles for their flavor and color, but the shelf stable pickles are delicious too!
Classic recipes with dill pickles
Now that you know how to make dill pickles: let’s eat! Our favorite way to eat them is to snack on them out of the jar (right?). But there are a few classic recipes that wouldn’t be the same without dill pickles. Here are a few recipes with pickles:
- Tuna salad: Pickles add just the right briny crunch to tuna salad. Try Classic Tuna Salad, Tuna Salad with Egg or Ultimate Tuna Salad Sandwich.
- Potato salad. They’re key in our classic potato salad recipe. Try Creamy No-Mayo Potato Salad.
- Russian dressing. They give just the right punch to Easy Russian Dressing, aka Big Mac sauce.
- Bloody Mary. The Classic Bloody Mary is perfect with a dill spear.
- Dill pickle dip. This Dill Pickle Dip is full of beautiful pickle flavor.
Let us know if you try our method in the comments below! PS check out our top dill recipes for what to do with the rest of your herbs!
This dill pickle recipe is…
Vegetarian, vegan, plant-based, dairy-free and gluten-free.
Print
How to Make Dill Pickles
- Prep Time: 20 minutes
- Cook Time: 0 minutes
- Total Time: 20 minutes
- Yield: 2 pint jars 1x
Description
Here’s how to make dill pickles! Follow this easy, no fail tutorial to fill jars with the best tangy flavor and satisfying crunch.
Ingredients
- 2 1-pint wide-mouth mason jars with lids
- 1 1/2 to 2 pounds small cucumbers (like Kirby)
- 3 cloves garlic
- ½ tablespoon coriander seeds
- 1 tablespoon whole peppercorns
- 1 tablespoon kosher salt
- ½ tablespoon sugar
- 2/3 cup white vinegar
- 1 ⅓ cup water
- 1 large handful fresh dill (or 2 teaspoons dill seeds)
Instructions
- Wash two mason jars and lids in hot soapy water, rinse, and let air dry.
- Quarter the cucumbers into four slices lengthwise (cut off tips so they to fit inside the jar). Peel and cut the garlic cloves in half.
- In a saucepan, place the coriander seeds, whole peppercorns, sugar, kosher salt, white vinegar and water. Whisk over low heat until fully dissolved, about 1 minute, then remove from the heat.
- In the two clean mason jars, tightly pack the cucumbers, garlic and fresh dill.
- Pour the brine mixture over the cucumbers. Tap the jars on the counter to release any air bubbles and top off the jar with extra water if any cucumbers are exposed.
- Wipe jar rims dry and place the lids on the jars and screw on the rings until they are hand tight.
- For refrigerator pickles (our favorite): Leave the jars in the fridge for 24 hours before tasting. The pickles last up to 1 month in the refrigerator (they’re not shelf stable, but they never last that long!).
- For shelf-stable canned pickles: Bring a large pot of water to a boil and have a canning rack ready. Place the jars in the boiling water with the jars lifted off of bottom of pot with a canning rack (or any rack that keeps them off the bottom). Boil for 10 minutes. Turn off the heat and allow to cool in the water for 5 minutes, then carefully transfer to cutting board and allow to cool to room temperature. Check the lids for a seal after 12 hours (make sure the lids pop down: if not, store the pickles in the refrigerator like in Step 8). Store in a cool place for up to 1 year.
- Category: Essentials
- Method: Canned
- Cuisine: American
- Diet: Vegan
Keywords: How to Make Dill Pickles, Dill Pickles Recipes
More types of pickles
Love pickles? (Us too.) You can pickle all sorts of veggies: not just cucumbers! Here are some more to try:
- Pickled Jalapeños or Pickled Banana Peppers Top your chili and burrito bowls!
- Pickled Garlic It’s might sound odd, but it’s uniquely delicious.
- Easy Pickled Carrots Eat as a relish, on a cheese board or in sandwiches…or inhale them right from the jar.
- Quick Pickled Radishes Beautifully pink and perfect for tacos.
- Quick Pickled Vegetables A rainbow of mixed vegetables in a jar.
- Quick Pickled Green Tomatoes The perfect way to preserve green tomatoes.
- Pickled Okra Tasty and briny, perfect for snacking or Bloody Marys.
- Easy Quick Pickled Onions Fantastic on tacos, sandwiches, and more.


This was great! I recently got an aero garden and was wondering what I was going to do with all of that deal! This was simple and fresh!!