
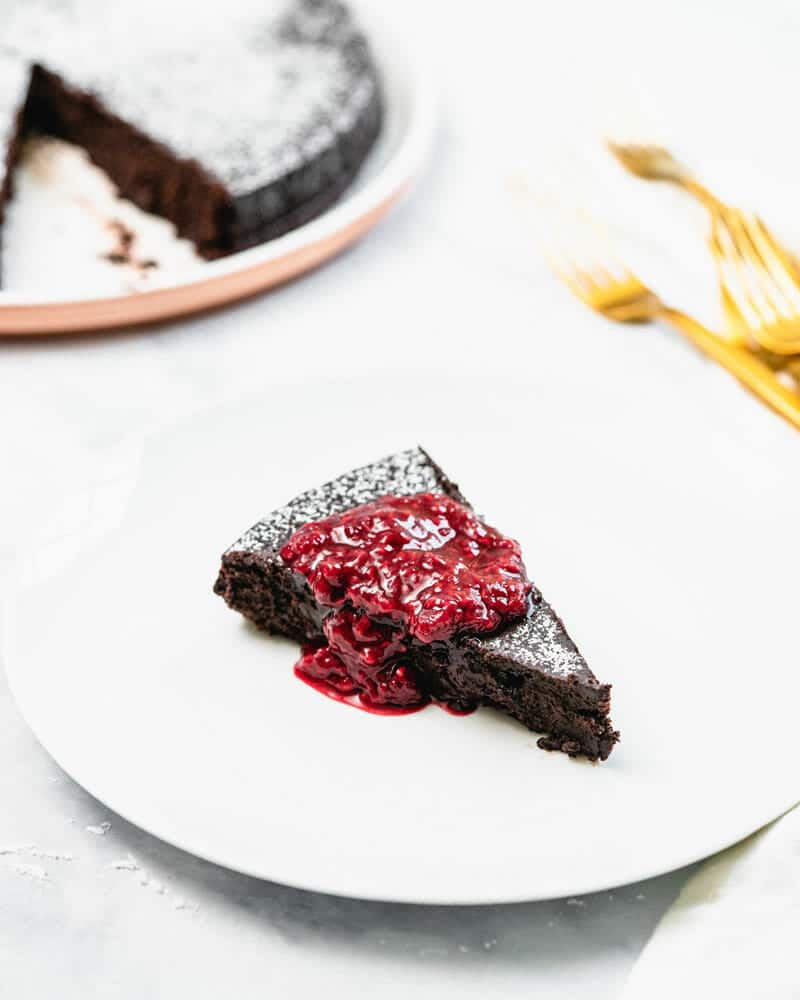
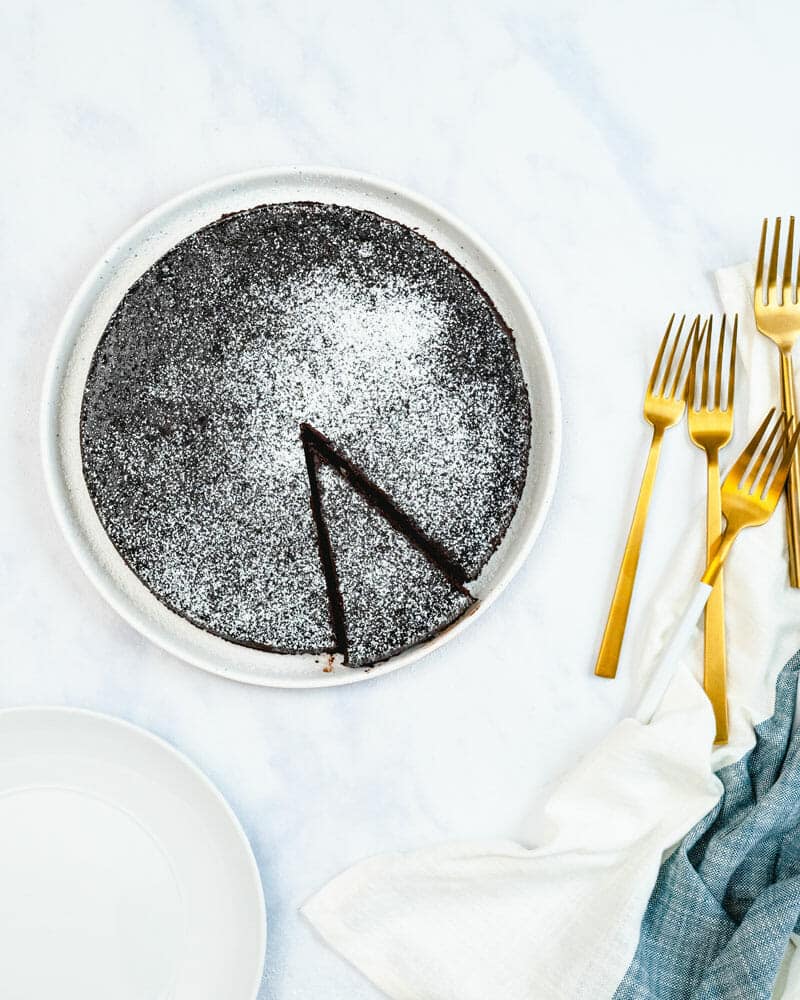
Calling all chocolate lovers: here’s the ULTIMATE fudgy and rich flourless chocolate cake! Paired with tangy raspberry compote, it’s decadent perfection.
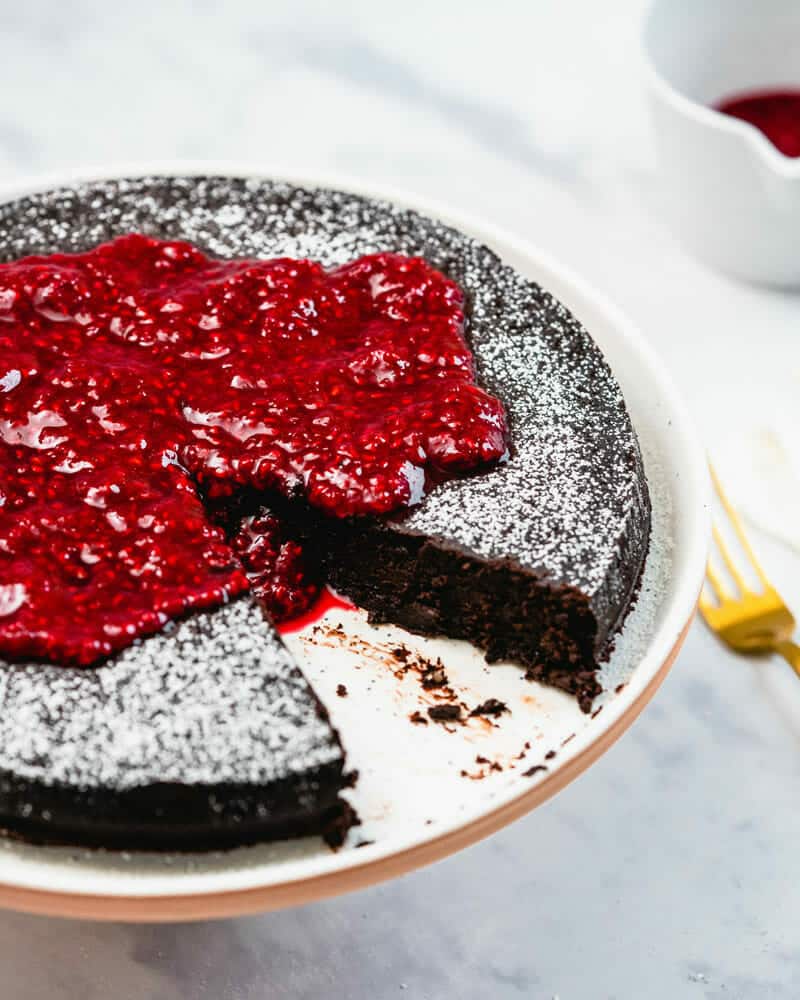
Get ready for the ultimate celebration dessert for a chocolate lover. Flourless chocolate cake! Most of the recipes you’ll find here are healthy recipes. But Alex and my “healthy” diet includes all things in moderation: including cake! This decadent flourless chocolate cake is meant for that occasional celebration, like Valentine’s Day or birthdays (we made it for mine). Rich and fudgy, dense and dark chocolaty, it’s a chocolate lover’s dream cake. Top it with this easy raspberry compote for a sweet tart pairing that cuts the sweetness of the cake perfectly.

What makes this the best flourless chocolate cake?
This flourless chocolate cake treat food, defined! You’ll won’t even want another piece, because it’s that satisfying. Here’s what makes this the very best gluten-free chocolate cake:
- It’s fudgy, not cake-y. This one is so rich it’s almost more like fudge than cake. (It’s my favorite cake texture!) Chill it for 1 hour before serving to get the fudgiest consistency.
- It’s ultra chocolaty. Dark or process cocoa powder makes an even more dark chocolaty flavor. Yep, this is desired for major chocolate lovers!
- It’s sweetened with maple syrup. This dessert uses maple syrup instead of refined sugar to add to the chocolate. There’s still lots of sugar, of course! But it’s a gentler sweetness that’s all natural.
- It’s easy to make & saves well. All you have to do is melt chocolate, then stir all the batter ingredients together and bake! Unlike many cakes which are best the day of making, this cake also saves well! You can refrigerate for a few days and it tastes just as good, or even freeze it (see below).

Take it over the top with raspberry compote!
Take this flourless chocolate cake over the top: make Raspberry Compote while it bakes! The raspberry sauce is the perfect pair because it’s sweet tart and cuts the deep fudgy texture of the cake. It takes about 15 minutes total to whip up. Here’s what’s great about this sauce:
- It’s got a lovely texture and tangy flavor. You don’t even need to strain this sauce; just simmer until it’s done!
- You can use frozen berries. No need to splurge on fresh berries for this one. Frozen taste just as good!
- Leftovers work for oatmeal, pancakes and more. Got leftover compote? Use it to drizzle over ice cream, cheesecake, oatmeal, pancakes, or waffles.
- Another option? Try Strawberry Sauce.
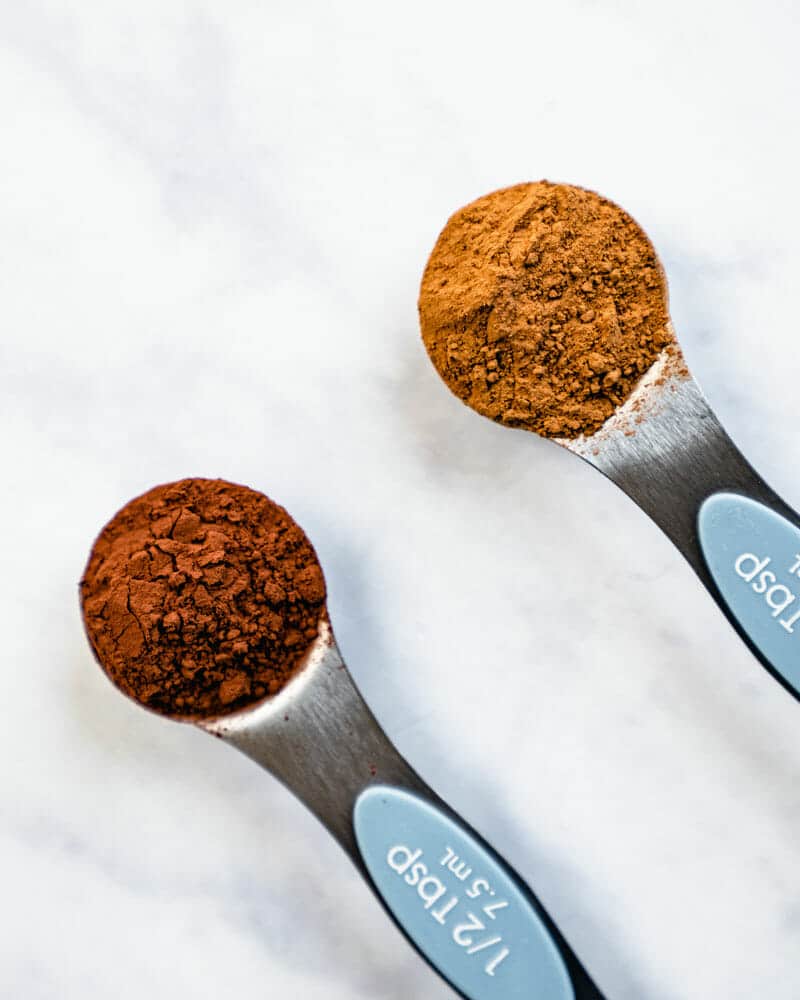
What’s Dutch process cocoa powder?
Dutch process cocoa powder is the type of cocoa powder used in this recipe. But what is it?
- Dutch process cocoa powder is like a dark chocolate version of cocoa powder. It’s been treated with an alkali to make it pH neutral, which gives it a darker color and milder flavor.
- Where to buy it? You should be able to find dark chocolate or Dutch process cocoa powder at your local grocery store, next to the regular cocoa powder.
- You can also find Dutch process cocoa powder online. Here are the two brands we’ve used and liked: Hershey’s Special Dark Cocoa Powder or Ghiradelli Dutch Process Cocoa Powder.
Another recipe that uses Dutch process cocoa powder? Our popular Healthy Chocolate Pudding Snack and our “Bliss Bites” (Healthy No-Bake Cookies).
What’s a bain marie? Why use one?
This recipe has an option for a water bath, also called a bain marie. A bain marie is the French term for hot water bath, what you’d say if you went to culinary school! A hot water bath is used to cook foods with a uniform heat, and helps them to set properly. Our Cherry Cheesecake recipe uses a hot water bath to get it perfectly cooked.
Does this flourless chocolate cake need a bain marie? Yes and no. Sometimes a flourless chocolate cake can come out with a lightly drooped middle. To prevent against this, we used a water bath. But it doesn’t affect the texture or flavor of the cake: just the look! So if you don’t care about the look and want to skip this step: go right ahead! You’ll be covering it up with raspberry compote anyway!

Make ahead and storage instruction
This cake is wonderful because it’s easy to make ahead and stores well. Here’s what you can do:
- Refrigerate at least 1 hour before serving! This helps to set the fudgy texture. It gives you the flexibility to make ahead and then just refrigerate until you’re ready to serve.
- Refrigerate for up to 3 days. Cover with aluminum foil or wrap in plastic, and this cake stores for up to 3 days refrigerated! It tastes just as good days later.
- Freeze for up to 1 month. One time I wrapped this cake in plastic wrap and drove it 10 hours to Minnesota, where I’m from. We defrosted it in the refrigerator and it tasted great topped with berries!
When to serve flourless chocolate cake
Save this cake for celebrations! Because it’s pretty rich and filling, we suggest that you use it for special occasions like:
- A birthday cake (it was mine!)
- A decadent winter dessert
- Valentine’s Day dessert
- Engagement party
- Dinner party dessert
- Anniversary dessert
Desserts for chocolate lovers!
As you may have sensed, I’m a major chocolate lover. If you are too (hi!), we’ve got a few desserts that are all about this tasty treat. Here are our favorite chocolate desserts:
- Ultimate Chocolate Mug Cake This is the absolute best chocolate mug cake recipe: made in 2 minutes!
- Chocolate Lava Cake Showy and decadent, with a molten lava center!
- Amazing Flourless Brownies Irresistibly fudgy, chewy and delicious.
- Chocolate Covered Bananas The perfect easy and healthy dessert! Store them in the freezer for whenever you crave a sweet bite.
- Vegan Chocolate Cake This decadent vegan chocolate cake features a vegan chocolate buttercream filling and a shiny dark chocolate ganache. Wow.
- Favorite Gluten Free Chocolate Cake This gluten free chocolate cake recipe comes out so rich and chocolaty, no one would guess it’s a gluten and dairy free dessert!
- Healthy Chocolate Pudding Snack Here’s a lighter option! This pudding tastes rich and chocolaty, but it’s just Greek yogurt, cocoa powder and maple syrup. And it’s made in 2 minutes!


This flourless chocolate cake recipe is…
Vegetarian and gluten-free. For plant-based, dairy-free and vegan, try Vegan Chocolate Cake.
Print
Flourless Chocolate Cake (for Chocolate Lovers!)
- Prep Time: 20 minutes
- Cook Time: 35 minutes
- Total Time: 55 minutes
- Yield: 16 1x
Description
Calling all chocolate lovers: here’s the ULTIMATE fudgy and rich flourless chocolate cake! Paired with tangy raspberry compote, it’s decadent perfection.
Ingredients
- 9 ounces semisweet baking chocolate chips (about 1 ½ cups)
- ¾ cup unsalted butter
- ¾ cup maple syrup
- 1 teaspoon vanilla extract
- 2/3 cup Dutch process cocoa powder
- ¼ teaspoon kosher salt
- 4 large eggs, plus 1 egg yolk
- To serve: Powdered sugar for dusting, Easy Raspberry Compote (or Strawberry Sauce)
Instructions
- Preheat the oven to 350°F.
- Prepare the pan: Cut a sheet of parchment paper into a circle to fit the bottom of an 8 or 9-inch springform pan. Place the parchment circle on the bottom and butter the entire pan, including the parchment paper.
- Melt the chocolate and butter: Fill a large saucepan halfway with water and bring to a simmer. Once the water is simmering, turn off the heat and place a large heat proof bowl over the saucepan. Add the chocolate and butter to the bowl, and stir until the chocolate is fully melted. (You can also melt the chocolate in the microwave in a liquid measuring cup, heating for a minute and then stirring, several times until the chocolate and butter are melted.)
- Finish batter and pour in pan: Once the chocolate is melted, remove the bowl to the counter and slowly whisk in the maple syrup, vanilla extract, cocoa powder, and kosher salt. Whisk in the eggs and egg yolk until fully incorporated. Pour the batter into the prepared pan and smooth into an even layer with a spatula.
- Prepare a water bath / bain marie (optional): Wrap aluminum foil tightly around the pan. Place it in a large pan (like a 9 x 13″ baking dish) and pour boiling water around it. The step ensures that the middle of the cake won’t sink in slightly. If you don’t feel like messing with it, you can skip this step: it looks just as good without.
- Bake: Bake 30 to 35 minutes until a thin crust forms on the cake and the middle is still slightly wobbly. The internal temperature should be 150F.
- Cool: Cool in the pan on a cooling rack until it is room temperature, about 1 hour. You can serve immediately or chill for 1 hour to get a more fudgy texture (that’s our favorite way to serve it). Store in fridge up to 3 days. (You can also make it ahead and freeze it; it freezes well)
- Serve: Invert the cake onto a plate, then gently remove the parchment from the bottom. Revert the cake onto a serving platter and dust with cocoa powder. Dust with powdered sugar and serve with Raspberry Compote.
- Category: Dessert
- Method: Baked
- Cuisine: American
Keywords: Flourless Chocolate Cake, Chocolate Cake, Gluten Free Chocolate Cake


I wish I had taken a picture of the cake before we cut into it. If you love fudgey brownies or fudgey cake, then this is for you. If you’re gluten free, this is for you. If you’re a choco-holic, then this is for you. Next time I’m going to sprinkle with sea salt.
Glad you enjoyed and sea salt would be perfect!
Hey, there! I think I’m going to try to this for a dinner party tomorrow night. I have a springform pan, though I’ve not used it yet. I’m a little confused on the cooling directions.
”Cool: Cool in the pan on a cooling rack until the cake allow to cool until room temperature, about 1 hour…”
Is a word missing or am I just not getting it? ? Do I let it cool until something specific with the cake happens or just keep it in the pan until it cools to room temperature?
Sorry for being dense. ?
That was a typo, thanks for alerting! It should be “Cool in the pan on a cooling rack until it is room temperature, about 1 hour.” and we’ve fixed it in the recipe. Thank you and we hope you love it!
Okay, great! Thank you!
Can we use flax seed replacement instead of egg
Unfortunately, the egg is pretty essential to this recipe!
This was excellent. Thanks for sharing. We loved it. Very rich so you only need a small piece. I also had it with vanilla ice cream. Next time will add strawberries. I will be making this again.
My cake is in the oven! I can’t wait to try it. Just wanted to leave a comment to let you know that the instructions do not note when to add the vanilla extract or the salt.
Thanks for letting us know, we’ve fixed this issue in the recipe! Hope you enjoy it!!
I’m making this for a friend’s birthday this weekend, and I’ve been really into cake decorating recently, so I wondered if it’s possible to use this cake for a multi-layered cake with buttercream. No tiers or anything, just maybe three thin layers, frosted, and some decorations and candles and stuff.
Thanks!!
It’s a very dense cake, so triple layer would be very rich unless you did very tiny slices. I wouldn’t recommend it for this one! This cake is delish as well: https://www.acouplecooks.com/decadent-vegan-chocolate-cake/
Thanks for the response!
This other recipe looks gorgeous, but alas, birthday boy is gluten-free. I’ll stick to one layer and do a very simple decoration.
Thanks again!!
hey guys, love your recipes and I thought I would try this one out. I followed the recipe as directed and baked for 25 minutes and my cake come out very fudgy which is great, but when I removed it from the pan it was in, it fell apart. any recommendations you would suggest so in the future the cake will not fall apart.
Thanks for writing! A few things: the bake time is 30 to 35 minutes or an internal temperature of 150F. Did you measure the internal temperature? Did you cool it for 1 hour to room temperature as stated in the recipe? Most importantly, did you use a springform pan? When you remove the outer edge of the spring form, the cake should not fall apart because it is still standing on the base. Let us know! We would also recommend doing the 1 hour chill in the refrigerator prior to taking out of the pan, since this firms up the texture even more.